
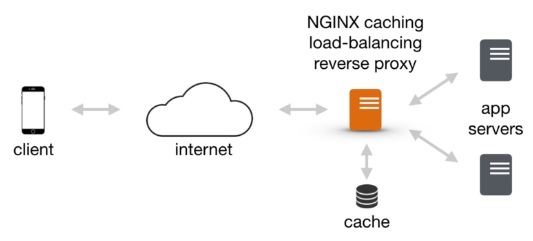
In the dynamic realm of web development, ensuring seamless performance and high availability is paramount to user satisfaction and business success. As traffic surges and demands fluctuate, a robust load balancing strategy becomes indispensable. Nginx, an open-source web server and reverse proxy, emerges as a frontrunner in this domain, offering efficient load balancing capabilities.
This comprehensive guide will delve into the intricacies of setting up load balancing with Nginx, empowering you to optimize your website performance and cater to an ever-growing user base.
Prerequisites:
- Basic understanding of Nginx configuration
- Access to an Nginx server
- Familiarity with command-line interface (CLI)
Step 1: Define Upstream Servers
The journey begins by defining the upstream servers, the pool of backend servers that will handle incoming requests. This is accomplished within the Nginx configuration file, typically located at /etc/nginx/nginx.conf.
Nginx
upstream myapp {
  server backend1 192.168.1.10:80;
  server backend2 192.168.1.11:80;
  server backend3 192.168.1.12:80;
}
In this example, three backend servers are defined, each with its respective IP address and port number. Replace these values with the actual addresses of your backend servers.
Step 2: Configure Load Balancing
Next, specify the load balancing method and direct traffic to the upstream servers. This is achieved within a virtual server block.
Nginx
server {
  listen 80;
  server_name example.com;

  location / {
    proxy_pass http://myapp;
    proxy_set_header Host $host;
    proxy_set_header X-Real-IP $remote_addr;
  }
}
In this configuration, requests arriving at port 80 and directed to example.com will be proxied to the myapp upstream group, ensuring efficient distribution of traffic among the backend servers.
Step 3: Implement Load Balancing Methods
Nginx offers a variety of load balancing methods to suit specific needs. Let’s explore two common approaches:
- Round Robin: Distributes requests evenly among available servers.
Nginx
upstream myapp {
  server backend1 192.168.1.10:80 weight=1;
  server backend2 192.168.1.11:80 weight=1;
  server backend3 192.168.1.12:80 weight=1;
}
Here, each server has a weight of 1, indicating equal distribution. Adjust weights to prioritize specific servers.
- Least Connections: Directs requests to the server with the fewest active connections.
Nginx
upstream myapp {
  server backend1 192.168.1.10:80;
  server backend2 192.168.1.11:80;
  server backend3 192.168.1.12:80;

  least_conn;
}
The least_conn directive ensures that servers with fewer active connections receive more traffic, optimizing resource utilization.
Step 4: Enable Health Checks
Health checks are crucial to identify and remove unresponsive backend servers from the load balancing pool. Nginx supports various health check methods, including:
- HTTP: Sends an HTTP request to a specific path on the server, checking for a successful response.
Nginx
upstream myapp {
  server backend1 192.168.1.10:80 check;
  server backend2 192.168.1.11:80 check;
  server backend3 192.168.1.12:80 check;

  check_http_status 500 502 503 404;
  check_timeout 5s;
  backup;
}
In this configuration, servers are checked every 5 seconds, and those returning error codes (500, 502, 503, 404) are temporarily removed from the pool.
- TCP: Establishes a TCP connection to the server, verifying its availability.
Nginx
upstream myapp {
  server backend1 192.168.1.10:80 check;
  server backend2


Leave a Reply