
Introduction
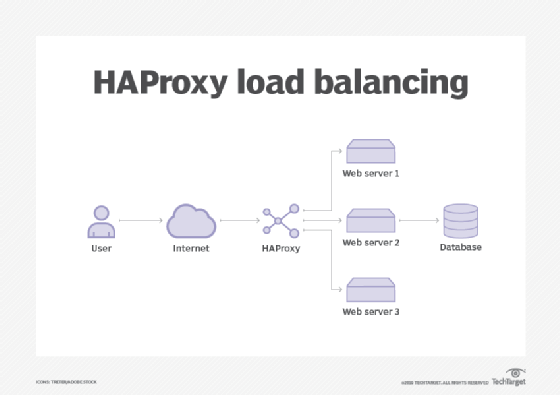
In the dynamic realm of web development, ensuring seamless user experience and application uptime is paramount. This is where load balancers step in, playing the role of traffic orchestras, distributing incoming requests across multiple servers to prevent overloading and optimize performance. Among the array of load balancers, HAProxy stands out as a powerful and versatile open-source solution. This comprehensive guide will equip you with the knowledge and skills to master HAProxy, enabling you to effectively balance the load and enhance the reliability of your web infrastructure.
Prerequisites
Before embarking on this journey, ensure you have a basic understanding of networking concepts, including TCP/IP protocols and web server operations. Familiarity with Linux command-line interface will also be beneficial.
Step 1: Installation
- Package Installation: Begin by installing the HAProxy package on your chosen server. For Debian or Ubuntu-based systems, execute the following command:
Bash
sudo apt-get install haproxy
- Configuration File: Locate the HAProxy configuration file, typically found at
/etc/haproxy/haproxy.cfg. This file will serve as the blueprint for your load balancing setup.
Step 2: Defining Frontends and Backends
- Frontend: A frontend acts as the entry point for incoming traffic. Define a frontend section within the configuration file, specifying the IP address and port where HAProxy should listen for requests. For example:
frontend web-frontend
    bind *:80
    mode http
    default_backend web-backend
- Backend: A backend represents a pool of servers that will handle the incoming requests. Define a backend section, assigning a name and specifying the balancing algorithm. Then, list the backend servers along with their IP addresses and ports. For instance:
backend web-backend
    balance roundrobin
    server webserver1 192.168.1.10:80 check
    server webserver2 192.168.1.11:80 check
    server webserver3 192.168.1.12:80 check
Step 3: Enabling and Starting HAProxy
- Service Enablement: Enable the HAProxy service to ensure it starts automatically upon system boot. Use the following command:
Bash
sudo systemctl enable haproxy
- Service Start: Start the HAProxy service to initiate load balancing. Execute the command:
Bash
sudo systemctl start haproxy
Step 4: Testing and Verification
- Access Web Servers: Access your web servers using their respective IP addresses. You should be able to connect to each server, confirming that HAProxy is effectively distributing traffic.
- Monitoring: Monitor the HAProxy status and statistics using the
haproxy -stfcommand. This will provide valuable insights into the load balancing process.
Conclusion
Congratulations! You have successfully configured HAProxy to load balance traffic across your three web servers. By following these steps and understanding the underlying concepts, you are well-equipped to manage and optimize your web infrastructure for enhanced performance and scalability. Remember to stay updated on the latest HAProxy releases and explore advanced features to further refine your load balancing strategies.


Leave a Reply